Hello.
How can we help you?
Respondant Permissions Overview
There are two types of settings that control the permissions for survey taking:
- Privacy Level controls who has access to take your survey
- Respondent Permissions control other survey-taking functions such as the ability to save and resume or edit a submitted response
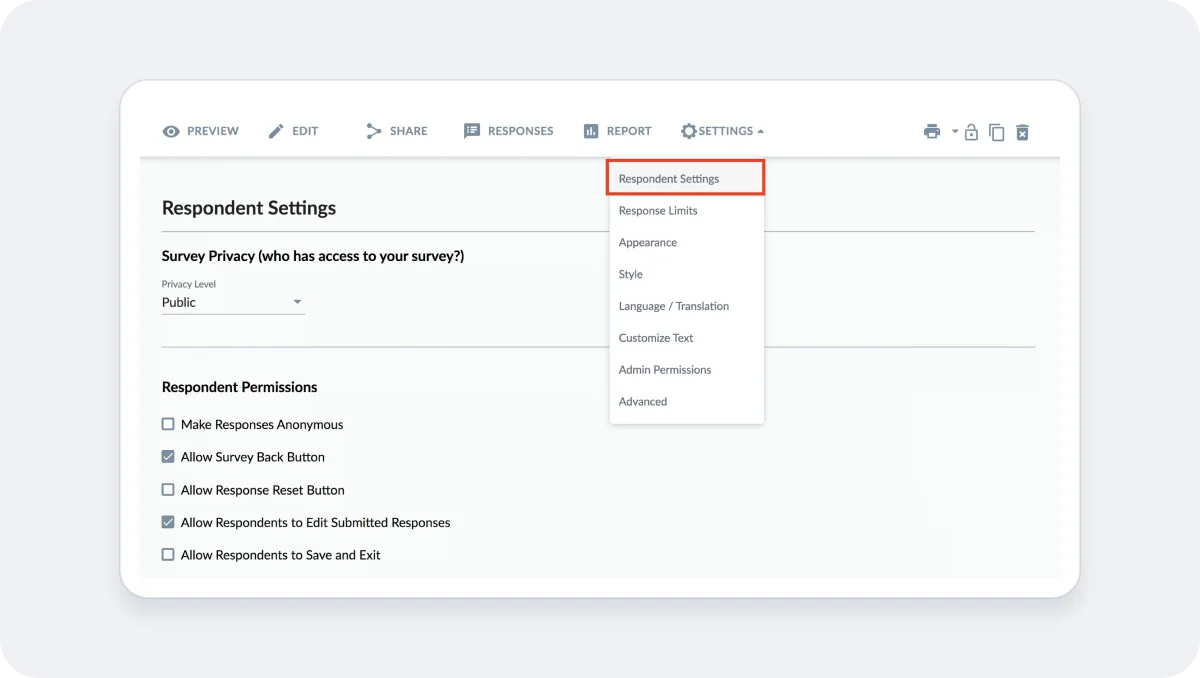
Both the Privacy Level and Respondent Permissions can be found within the survey editor under Settings -> Respondent Settings.

Privacy Level
A survey’s privacy level determines who can take your survey. These privacy levels can be enabled by going to the Respondent Settings of the Survey. Privacy levels include:
- Public
- Password Protected
- Email Invitation Only
- Allow Specific Contacts
- Allow All Contacts
1. Public
Setting a survey to Public means anyone who has your survey link may take your survey and all responses will be anonymous. Public surveys are most useful when you need summary survey results and don’t need to link responses to respondents.
2. Password Protected
Password Protected surveys are secured with one single password for all respondents. Setting a survey to Password Protected means any respondent that knows the password may complete this survey. All responses will be anonymous. This is similar to a public survey, but the password adds an extra layer of security.
3. Email Invitation Only
Setting a survey to Email Invitation Only means that only respondents who receive a Checkbox email invitation will be able to take the survey. Invitations can be sent to registered Checkbox Contacts/Groups or to a list of email addresses. Responses will then be associated with either the Contact’s username or email address. This setting is most useful when you want to take advantage of Checkbox’s email scheduling and tracking features, or when you want your respondents to be automatically logged in through the email invitation link.
NOTE: The survey links in Checkbox email invitations are unique to each recipient and are not meant to be shared or forwarded.
4. Allow Specific Contacts
Setting a survey to Allow Specific Contacts lets you choose certain Contacts or Groups of Contacts to access your survey. Only the Contacts and Groups that you add to the Respondent List will be able to take the survey. Contacts on the list must either login to Checkbox to take the survey or must be auto-logged in through a Checkbox email invitation. Responses will be associated with each Contact’s username. Allow Specific Contacts surveys are most useful when you want to tightly control who can take your survey or you want to require respondents to log in.
5. Allow All Contacts
Setting a survey to Allow All Contacts means that anyone with a Checkbox username and password will be able to take your survey. Contacts must either login to Checkbox to take the survey or must be auto-logged in through a Checkbox email invitation. Responses will be associated with each Contact’s username. This setting is most useful when you want to give all your Contacts access to a survey or when you are using Checkbox’s self-registration feature to manage access to a survey.
Respondent Permissions
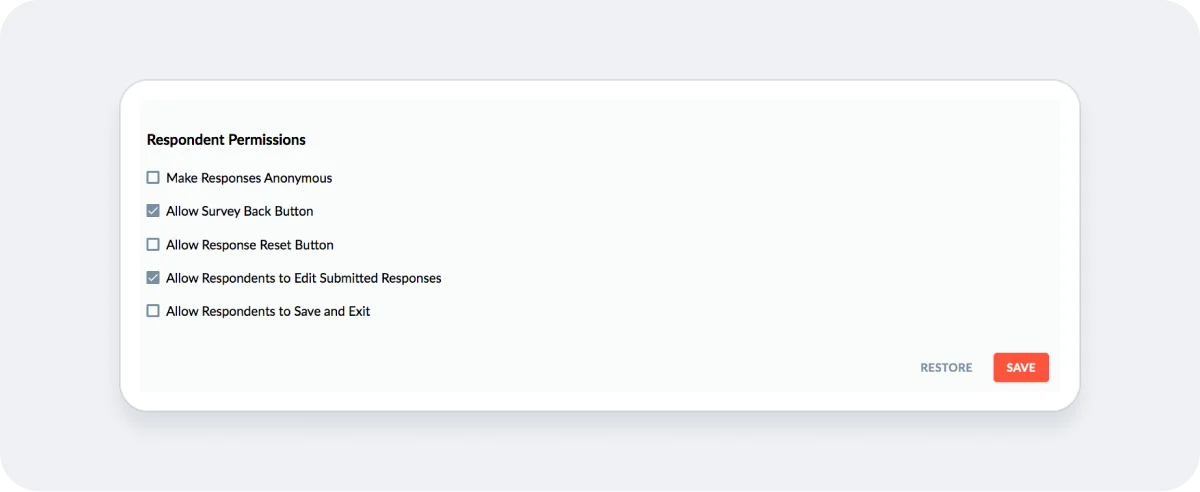
Respondent Permissions determine the behavior options for responses. Options include:

1. Make Responses Anonymous
Enabling the Make Responses Anonymous will mask any personally identifiable information that would normally be tracked with a response, including IP address, email address for email invitation recipients, username for Contacts, and Contact profile information. You must enable this setting before you send out your survey as it is not retro-active. Conversely, disabling this setting will only track respondent information for responses that are collected after you disable the anonymous setting. In other words, the setting does not work retroactively.
2. Allow Survey Back Button
When enabled, a “Back” button will appear with the survey’s navigation buttons allowing respondents to move backward in a survey and review/modify responses prior to survey submission.
3. Allow Response Reset
When enabled, a “Form Reset” button will appear with the survey’s navigation buttons allowing respondents to clear all responses on that survey page.
4. Allow Respondents to Edit Submitted Responses
This setting allows respondents to return to a previously submitted survey and modify their completed response.
NOTE: This setting may work for Public surveys as long as the respondent is using the same computer/browser and hasn’t cleared their cookies, but it is not guaranteed. The foolproof way to allow respondents to edit completed surveys is to require a login or send the survey through a Checkbox email invitation.
5. Allow Respondents to Save and Exit
This setting allows respondents to pause their survey response at any point and resume it at a later date, while saving their progress. Resumes responses will pick up where the respondent left off. Responses can be resumed from a Checkbox email invitation link or from a unique resume link, if the Save and Exit button is also enabled.
